Why your AI video looks fake (and how to fix it)

Stop burning through credits and follow this workflow to create hyper-realistic AI videos easily. We’re giving you all the inside tips and tricks to get the right video on your first few generations, not your 30th.

You’ve already burned through all your credits and somehow on your 20th generation something still feels off. Your video looks AI despite the lengthy prompt, the switching between models, and the reference images you carefully selected.
All of the AI videos online claim to be “done in one-shot”, “just took a few minutes”, and they look flawless. How are they doing it?
In this article, we’re giving you all the inside secrets on how to create AI videos that look hyper-realistic and how to set it up so you get the right video in your first few generations.
To follow along with this guide, use this link to start your first Flows project: https://elevenlabs.io/flows
By the end of this article you will know:
What’s making your video look fake
AI videos usually look fake because these elements weren’t considered when they were made.

1. Lighting
When you leave lighting unspecified, the model can generate light that feels generic or doesn’t match the setting. Shadows and reflections may not make sense together, which makes the scene feel artificial. Describe the light source, direction and time of day in your prompt, such as “harsh overhead fluorescent lighting” or “low afternoon sun coming through blinds.” You can also use a reference image to guide the look.
2. Setting
Look around your room. Is it perfect? Or is something out of place? Is it unique to you? Does it feel customized? Did you spend time choosing curtains, furniture and photos on the wall? When it comes to AI videos you also need to spend a little bit of time customizing the setting. Not so it looks perfect, but so it looks unique and customized to your story.
3. Character
When AI generates characters by itself you’ll start to notice a common theme of how they look. Symmetrical facial features, perfect skin, the styled hair. They look perfect, which is what makes them look so wrong. When you see people walking down the street they all look different with a unique sense of style, maybe their hair is a little messy, they have under eye bags and the beginning of a wrinkle from their 9-to-5. They aren’t perfect. They’re real. And when left to chance AI doesn’t bring this realism to its characters.
4. Physics
When an action is vague, the model has to fill in how your character and the objects around them should move. This can lead to floating props, hands passing through objects or movements that don’t follow cause and effect. Describe the action step by step, including how objects respond. Keep each shot focused on one clear action, then check the generated result for mistakes.
5. Sound
When you leave audio entirely to the video model, you have less control over the voice, performance and effects. You may get a voice that doesn’t suit the character or sounds that don’t match the action. Generate the dialogue with Eleven v4 first, then use it as an audio reference in a supported model such as Seedance 2.5. Check the voice and lip sync, then add precisely timed SFX v3 effects and background ambience in post-production.
6. Post-Production
When you use a generation without editing, it often times it looks less cinematic. Treat it like footage that needs a final pass. Correct exposure, white balance and saturation, match the shots, and sync your audio. If it suits the intended look, add subtle film grain or a compatible creative LUT. Fix generation errors first, since grading won’t repair broken physics or a changing face.
The workflow to fix it
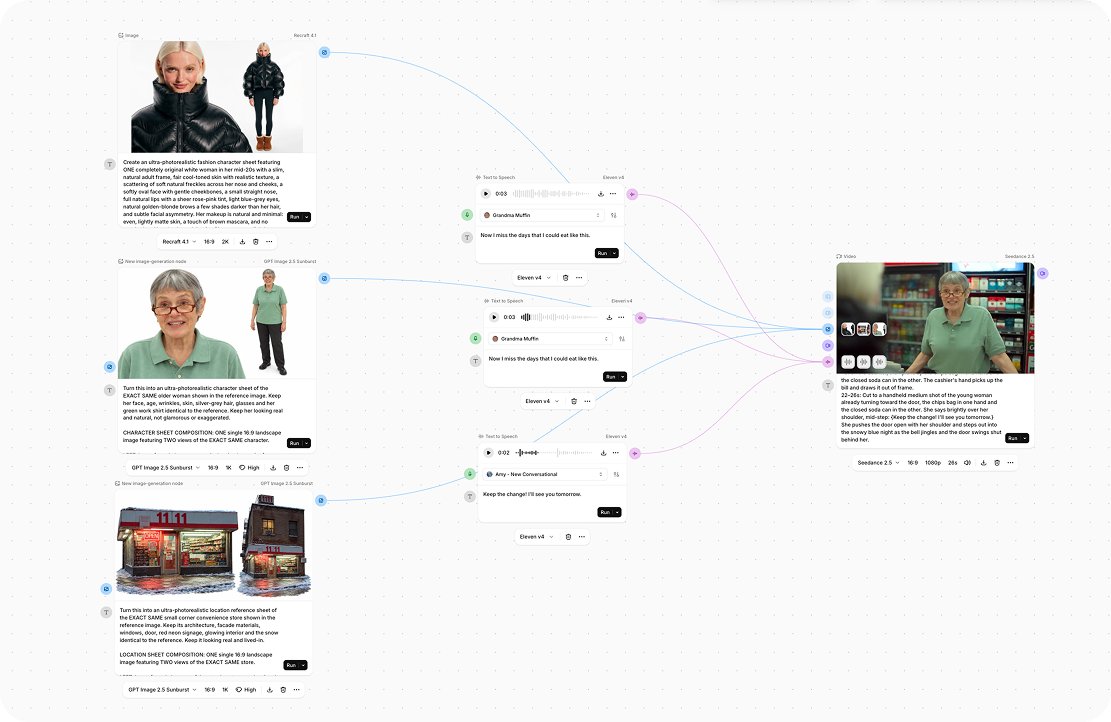
Step 1: Plan the details
Spend 5 to 10 minutes thinking through your story. What should the character look like, how should they dress, how do they talk? What time of day is it? Should the lighting be moody? Super bright? Jot down the details of how you want your story to be told.
Step 2: Build your scene
Open Flows in ElevenCreative and select a new flow. Add your first node and select Image Generation. Describe the room and lighting for your story in the prompt box. Hit run.
Step 3: Cast your star
Now it’s time to build your character. We’re going to do this by creating a character sheet. Add another image generation node and set the model to Recraft V4.1. Paste the prompt below into Claude, then describe your character. Be as detailed as possible including their clothes, their skin, their makeup, and their hair. Claude will write you a prompt to paste into the prompt box. Hit run.
Create a hyper-realistic, true-to-life photographic character sheet featuring ONE completely original [woman/man/person] in their [age range, e.g. late 20s] with a [height and build, e.g. average-height, athletic adult frame], [skin tone] skin with realistic, unretouched texture — visible pores, fine vellus hair, faint natural unevenness in tone and small natural imperfections — [face shape], [cheekbones], [nose], [lips and natural lip tone], [brows], and subtle natural facial asymmetry. Their expression is [expression and mood], looking directly into the camera with [attitude].

Their most recognizable feature is [signature feature, usually hair: length, color, texture, style, part]. They wear [accessory 1 with materials and details], [accessory 2], and [accessory 3].

They wear [top: fit, color/pattern, fabric, neckline, sleeves/straps, length, construction details]. They pair it with [bottoms: rise, cut, color, fabric/wash, closures, pockets, how they fall at the hem]. They wear [shoes: style, color, material] with no visible branding.

Their appearance is [3–4 vibe words], and unmistakably human.

CHARACTER SHEET COMPOSITION: Create ONE single 16:9 landscape image featuring TWO views of the EXACT SAME character.

LEFT: Large frontal close-up portrait showing their entire face, true-to-life skin texture, [signature feature], [each accessory visible at this framing], and the [neckline/upper details of the top].

RIGHT: Complete head-to-toe full-body standing photograph of the same person with identical facial features, [signature feature], [every accessory], [top], [bottoms], and [shoes], standing naturally upright with arms relaxed at their sides, feet fully included.

Both views on a completely pure white (#FFFFFF) seamless studio background. Hyper-realistic documentary-style studio photography shot on a full-frame camera with an 85mm lens, natural soft daylight-balanced softbox lighting with gentle shadows, true-to-life color, no retouching, no airbrushing, no beauty filter, no skin smoothing. Realistic skin pores and natural texture, accurate fabric detail on [main fabrics, e.g. cotton jersey with visible knit, denim with twill weave and topstitching], natural creases and slight wear in the clothing, subtle realistic highlights on [any metal/jewelry], natural anatomy, accurate adult body proportions, realistic hands. No [list of items they are NOT wearing, e.g. bag, hat, bracelets, rings, watch], no text, no logos, no additional people, no watermarks, no CGI or illustrated look.
Pro tip: use this prompt to create a Claude skill so you can easily call on this prompt whenever needed
Step 4: Give them their lines
Once you see your character's final look, you start to envision how they should sound. With Eleven v4 you can bring their voice to life. Add a node on your flow, this time for text to speech. Search the ElevenLabs voice library for the right voice, then type your character’s script in the text box and hit run.
Pro tip: To find the right voice faster use filters for gender, age, and language.
Step 5: Bring it all together
Add another node onto your flow, this time for video generation. Connect the image you generated for your setting, character sheet, and text to speech to your video generation node.
Step 6: Write your prompt
Now all you need is a prompt for your video. Paste this prompt into Claude. Describe your video to Claude and then paste the prompt it gives you back into your prompt box in your Flow. Select your model, aspect ratio, resolution and duration.
PROMPT
Duration: [X] seconds.

Audio: [Every sound channel: dialogue with language and delivery in { }, sound effects in < >, music in ( ) or "No background music", and "No subtitles" unless subtitles are wanted.]

Context: [Asset roles first, if any uploads. Then: who the subject is — original adult, age range, build, skin tone, face, hair, clothing with exact colors, fabrics and fit — what they are doing, and where: location, time of day, weather, light source and direction, key props and spatial layout. Then the look: hyper-realistic live-action footage, shot on a cinema camera with natural lens character, true-to-life color, natural skin texture with visible pores and small imperfections, realistic fabric movement, accurate physics and anatomy, realistic hands, subtle natural film grain, no beauty filter, no CGI, illustration or plastic look.]

Movement & Editing:
0–[X]s: [Shot size and camera position/movement (static, slow push-in, handheld follow, pan, tilt, orbit…), what the subject does, observable expression changes, and what the frame looks like at the end of the segment.]
[X]–[Y]s: [Next shot or continued move. State whether it's a cut or one continuous take, the action, and the end state.]
[Y]–[Z]s: [Final beat, ending on a clear, settled frame.]
Keep [subject identity, headcount, clothing, props and lighting] consistent throughout. No text, no logos, no watermarks, no additional people.

ASSETS & SETTINGS (set outside the prompt)
upload order: [image1 = …, video1 = …, audio1 = …, or "none (text-to-video)"]
duration: [X]s | aspect: [16:9 / 9:16 / 1:1] | resolution: as high as the tool allows

CHECK
[2–4 specific things to watch in the result for THIS prompt, e.g. identity drift between cuts, headcount, hands, lip sync on the dialogue line, music sneaking in, subtitle or text leak, timing of the key action, and one suggested fix if it goes wrong.]
Pro tip: For video generations one of the most popular models for realistic videos is Seedance 2.5.
Step 7: Add in sound effects
Add in your final node and select sound effects. Type out the sound effect you need for your video in plain language. Export each sound effect.
Step 8: Post production
Finally, you’ve generated the perfect video. Now we just need to add the final layer of polish. Download your video from ElevenCreative and open it in Premiere Pro or another editor of your choice. Layer in your sound effects on the timeline.
Depending on the aesthetic of your video you will want to play around with the settings, but we recommend adding a LUT and a vignette to your video to enhance the colors and cinematic feel.
What can you create?
Curious what all of this looks like in action? Check out some of our favorite realistic videos created on ElevenCreative this week:


