I spent 3 months figuring out AI influencers. I walked out with $39k and the full playbook

The AI influencer market is past $6 billion. Brands are paying AI models $1,000-10,000 per post. One AI model gained 1,000 Instagram followers in 5 days. Another clears $11,000/mo without sleeping, burning out, or having a bad week.
Building one is not gated anymore. No camera, no team, no budget. A laptop, the right tools, and the willingness to ship something most people will scroll past while it eats their feed.
This is the short version of the playbook, from zero to an AI model that converts on multiple platforms.
Step 1 - Create the face

The face is the foundation. Everything else lives or dies on whether your generations look like the same model two months from now.
Pull two reference faces from Pinterest. Not one, not three, two. And make them contrasting on purpose.
> Face #1 sets the vibe of the niche, sharp cheekbones, cold look, strong jaw
> Face #2 is the donor, baby face, full lips, hair color, eye color
Most new AI accounts look copy-pasted because they used a single reference. The model averages and you get a face nobody can place in a niche.
Picking faces where the eyes and bone structure are clearly visible matters more than how attractive either input is. Lighting interference will cost you a week of bad gens.
Promt:
👥 Swap
1👤[Face] +2👤[Face]
Integrate a face into an existing scene. Substitute the face in the reference image with the face from the donor image. The objective is a seamless merge: the new face must inherit the exact expression, pose, and lighting interaction from the reference, while its color attributes (hair and eyes) are adapted from the donor for a perfectly harmonious and natural result.

👥 Swap
1👤[Face] + 2📍[Body] + 3👤[Ref]
Generate a single, unique image. Use the facial structure, head shape, eye color, nose, mouth, and complexion/skin details of [Image 1]. Use the body type, proportions and physique of [Image 2]. Use the outfit, clothing style, pose, background and environment of [Image 3]. Ignore the face and body from Image 3 completely — use ONLY the face from Image 1 and body type from Image 2. The final result must be seamless, high quality, and look like one cohesive, realistic human being and scene.

👥 Mix
1👤[Face] + 2📍[Body] + 3👤[Ref your model] 4👤[Ref]
Generate a single, unique image. Use the facial structure, head shape, eye color, nose, mouth, and complexion/skin details of [Image 1]. Use the body type, proportions and physique of [Image 2]. Use the outfit and clothing style of [Image 3]. Use the pose, body positioning, background and environment of [Image 4]. Ignore the face and body type from Image 3 and Image 4 completely — use ONLY the face from Image 1 and body type from Image 2. The final result must be seamless, high quality, and look like one cohesive, realistic human being and scene.

👤 Clean (remove accessories)
1👤[Ref your model]
Remove all accessories and tattoos from the person in the image, including earrings, rings, necklaces, bracelets, piercings, tattoos, body art, and any other jewelry or accessories. The skin where tattoos were must be clean and natural. Keep everything else exactly the same — face, hair, outfit, background, lighting. The result must look natural and seamless.
Step 2 - Create the dataset

> A dataset is your raw material, the clean stack of photos you feed the ai to train the lora
> A LoRA is the trained model that permanently remembers your AI model's features and reproduces them in any environment
The golden rule of the whole game: perfect dataset = perfect lora. garbage in, garbage out
The pipeline:
First you make the base identity, generate from scratch with a prompt, merge two references like in step 1, or find something unique. What you actually need out of step 1 is one clean 4K headshot of your model. That is the anchor. Everything in the dataset gets the face swapped to match that one image.
But you don't just blindly swap everything
There is a strict golden ratio for what the dataset should contain
> 70% close-up shots, the face, direct sharp eye contact, plus a few with the head slightly turned. This is what teaches the LoRA your model's identity
> 20% full-body, head to toe, varied poses, varied environments
> 10% detail shots, back, accessories, glasses, specific angles, hands, jewelry, anything that shows up consistently in your content
What does not belong in the dataset
> Photos where the model is sitting at a table 30 feet from the camera and you can't read the face or the body
> Heavy filters that obscure features
> MWotion blur, low light, anything where the lora has to guess what's there
If it's a bad reference photo, it's a bad lora training image. you cannot fix this in post
Pro tip for anyone planning to run more than one AI model
Prepare one clean faceless dataset upfront. Same composition, same ratios, same shots, no face baked in. Then for every new model you launch, just face-swap your new identity onto that same dataset and train the LoRA. Saves dozens of hours per model and keeps the visual quality consistent across your whole lineup.
How to actually pull it off
Two paths
> Reference-based, pull full-body and detail shots you like from Pinterest, ask Claude or Grok to describe each one as a detailed prompt, then drop the prompt plus your 4K face from step 1 plus the reference into Wan 2.7 on Wavespeed and generate the matching shot in your model's identity
> Faceswap workflow on RunPod, faster, more control, more setup, covered separately in my TG
https://wavespeed.ai/?ref=0xkiyoro

Aim for a final dataset of 30-90 images covering the 70/20/10 ratio. that's enough to train a clean lora that doesn't drift across the next 1,000 posts
If you only need static images and are not training a LoRA yet, 10-15 images covering all three categories is the minimum to keep your model looking consistent across short-form content.

Promt
Create a professional character reference sheet based strictly on the uploaded reference image. Use a clean, neutral plain background and present the sheet as a technical model turnaround while matching the exact visual style of the reference (same realism level, rendering approach, texture, color treatment, and overall aesthetic). Arrange the composition into two horizontal rows. Top row: four full-body standing views placed side-by-side in this order: front view, left profile view (facing left), right profile view (facing right), back view. Bottom row: three highly detailed close-up portraits aligned beneath the full-body row in this order: front portrait, left profile portrait (facing left), right profile portrait (facing right). Maintain perfect identity consistency across every panel. Keep the subject in a relaxed A-pose and with consistent scale and alignment between views, accurate anatomy, and clear silhouette; ensure even spacing and clean panel separation, with uniform framing and consistent head height across the full-body lineup and consistent facial scale across the portraits. Lighting should be consistent across all panels (same direction, intensity, and softness), with natural, controlled shadows that preserve detail without dramatic mood shifts. Output a crisp, print-ready reference sheet look, sharp details.

1) Front view (passport front view)
Use the uploaded girl's face as an exact identity reference. Create a photorealistic studio portrait in passport photo style: the girl is looking straight into the camera, neutral facial expression, closed mouth, both eyes clearly visible, soft even lighting with no harsh shadows, pure white background, head and upper shoulders visible, high skin detail, natural facial features, ultra realistic, centered composition, exact same identity, preserve facial proportions, same nose shape, same eyes, same lips, same jawline, no beautification, no face distortion.

2) 45° half-turn left
Use the uploaded girl's face as an exact identity reference. Create a photorealistic passport-style portrait on a pure white background. Turn the head 45 degrees to the left, eyes looking slightly toward the camera, neutral expression, soft studio lighting, no strong shadows, sharp and symmetrical facial details, natural skin texture, head and shoulders only, centered framing, exact same identity, preserve facial proportions, no face distortion.

3) 45° half-turn right
Use the uploaded girl's face as an exact identity reference. Generate a photorealistic passport-style portrait on a pure white background, head turned 45 degrees to the right, eyes looking slightly toward the camera, neutral facial expression, soft even studio lighting, high facial detail, realistic skin texture, centered composition, shoulders visible, exact same identity, preserve facial proportions, no face distortion.

4) Left profile 90°
Use the uploaded girl's face as an exact identity reference. Create a photorealistic biometric profile portrait with the head turned 90 degrees to the left, pure white background, soft even studio lighting, highly detailed facial contours, natural hair, sharp nose, lips, and jawline silhouette, passport photo style, exact same identity, preserve facial proportions, no face distortion.

5) Right profile 90°
Use the uploaded girl's face as an exact identity reference. Create a realistic biometric profile portrait with the head turned 90 degrees to the right, pure white background, soft studio lighting, neutral expression, sharp facial contour, realistic skin and hair texture, passport-photo style, high resolution, exact same identity, preserve facial proportions, no face distortion.

6) Full set of 5 angles at once
Use the uploaded girl's face as an exact identity reference. Create a set of 5 photorealistic passport-style portraits on a pure white background: front view, 45 degrees left, 45 degrees right, full left profile, full right profile. Keep identical lighting, camera distance, facial expression, hairstyle, and biometric facial accuracy across all images, exact same identity, preserve facial proportions, same nose shape, same eyes, same lips, same jawline, no beautification, no face distortion.
Step 3 - Train a lora (optional)

Skip this if you are only doing static images. If you are going to ship video at scale, train one.
A LoRA locks your model's identity across every generation. Same proportions, same face, same details, every single time. Without it you will get drift after 50-100 posts and subscribers will notice.
Requirements:
> 30-90 images, the dataset from step 2 plus more variations
> A caption file per image describing what is in it
> All of it zipped into one archive
Train it on Z-image via Wavespeed, 3,000 steps, costs around $3. That is not a typo. The same training that needed a rented A100 and a Python pipeline two years ago is now a $3 button.
Step 4 - Generate the video
Video is the leverage. That is where reach comes from, where reach turns into followers, and where followers turn into revenue.
Two paths:
Path A, Kling 3.0
> Upload a reference video, ideally a clip of someone with a similar build and hair to your character
> Generate a first-frame image where your character is anchored to frame 1 of that reference
> Drop both into Kling, write a tight motion-control prompt, run it
> Works for ~80% of cases, fast, no infra needed
Path B, ComfyUI custom workflows

> Rent a GPU on runpod or vast.ai
> Spin up a Comfy template, load your workflow
> Drop in the reference video and first frame
> On an RTX 5090 it is 15-20 min per clip, on an RTX Pro 2000 around 7 min
> The result is noticeably tighter than Kling, no drift, real biomechanics, but you need the workflow and the patience
Both are valid. Path A is for getting started. Path B is what scales.
Step 5 - Strip the metadata
Every AI video contains hidden data that flags it as AI-generated content. Instagram, TikTok and Meta are already downranking such videos right now. If you skip this step, you lose half your reach before anyone even sees the clip.
The process is simple:
> Import the video into CapCut
> Lightly crop the edges, this removes metadata embedded along the frame borders
> Add grain, gets rid of the "plastic" AI look
> Slightly bump the brightness, removes the flat AI image look
> Bump the sharpness, recovers detail
After this, the platform reads the video as regular phone footage. There are more nuances if you're running multiple accounts from the same device, but this CapCut pass handles 80% of the problem.
Step 6 - distribute and funnel
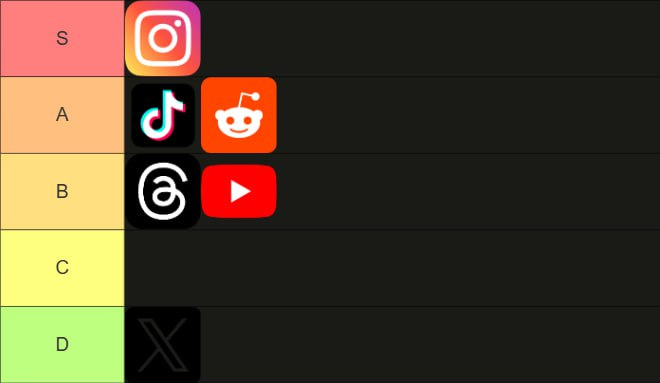
Ship to every platform you can manage. TikTok, Instagram Reels, Reddit, X, Pinterest, Threads. Each platform rewards different content but the model stays the same.
Soft content only at first. No pricing, no links, no monetization for the first 500-1000 followers. Let the algorithm decide she is a real person before you ever ask anything from her audience.
Once the account hits around 1,000 followers, drop one bio link. One funnel, one destination. The platform that actually converts in 2026 is Fanvue, not OnlyFans. Fanvue takes 15% cut versus 20%, is more friendly to AI models, and has less friction at signup.

Linktree-style routers like link.me work well, point them at fanvue + your other socials in one stack
The actual money lives on fanvue. Wall feed gets people in the door. real revenue is in tips and ppv content. That's a separate playbook
The full funnel, in one line
Niche → face merge (nano banana on wavespeed) → dataset (wan 2.7) → optional lora (z-image, $3) → video (kling or comfy) → metadata strip (capcut + telegram pass) → ig + tiktok + reddit + x + pinterest + threads → fanvue

Aitana López took 18 months to build because half the tools did not exist yet. Lil Miquela needed a studio and millions in production. Maya, the AI model out of Austin, did $43k in her first 30 days running on 4 markdown files.

Today, launching a ready-made AI character takes 3 weeks. But very soon, it will take just a couple of days.
The bottleneck hasn't been computing power or model quality for a long time. The real bottleneck is instinct: knowing which character people will want to follow before they even realize it themselves.
PS i drop workflows, prompts, faceswap pipelines and the parts of this i can't post publicly here: https://t.me/KiyoroAlpha