@aiedge_: More people need to know this ...
More people need to know this exists - Claude Design has to be the most underrated tool Anthropic has ever shipped.

After spending the weekend testing Anthropic's new AI design tool, I don't think I'll ever open Canva or Figma again.
And honestly, I'm surprised more people haven't made the switch (they will soon).
You can literally build visuals for anything - marketing campaigns, presentations, infographics, proposals, and way more.
This is the complete guide to mastering Claude Design.
And trust me, after reading, you'll never use another design tool again.
Contents
Section I: Intro to Claude Design
Section II: Accessing Claude Design in 60 Seconds
Section III: Using Claude Design
Section IV: Real Examples
Section V: Pro Tips (rapid-fire style)
Closing
Intro to Claude Design
Last Friday, Anthropic Labs shipped Claude Design - a new product that lets you collaborate with Claude to create polished visual work.
https://x.com/i/status/2045156267690213649
This announcement post got nearly 60M views! (and for good reason)
It's simply the best design tool on the market, and you can literally build visuals for anything in minutes.
Think: designs, prototypes, slides, one-pagers, and more.
If you need a visual, Claude Design can build it.
Traditional visual design tools like Figma share a common barrier to entry: a learning curve to achieve the outputs you want.
I've literally caught myself spending 1-2H+ in Figma/Canva manually spacing things, adjusting color palettes, and so on.
Claude Design completely flattens that learning curve and produces better visuals in minutes.
All you have to do is explain in natural text what you want, and Claude Design builds it.
Claude Design is a completely separate platform from all the other Claude tools (with its own usage limits), so let me show you how to get started.
Accessing Claude Design in 60 Seconds
Open Claude on the web, and navigate to the left sidebar, where you can find "Design."
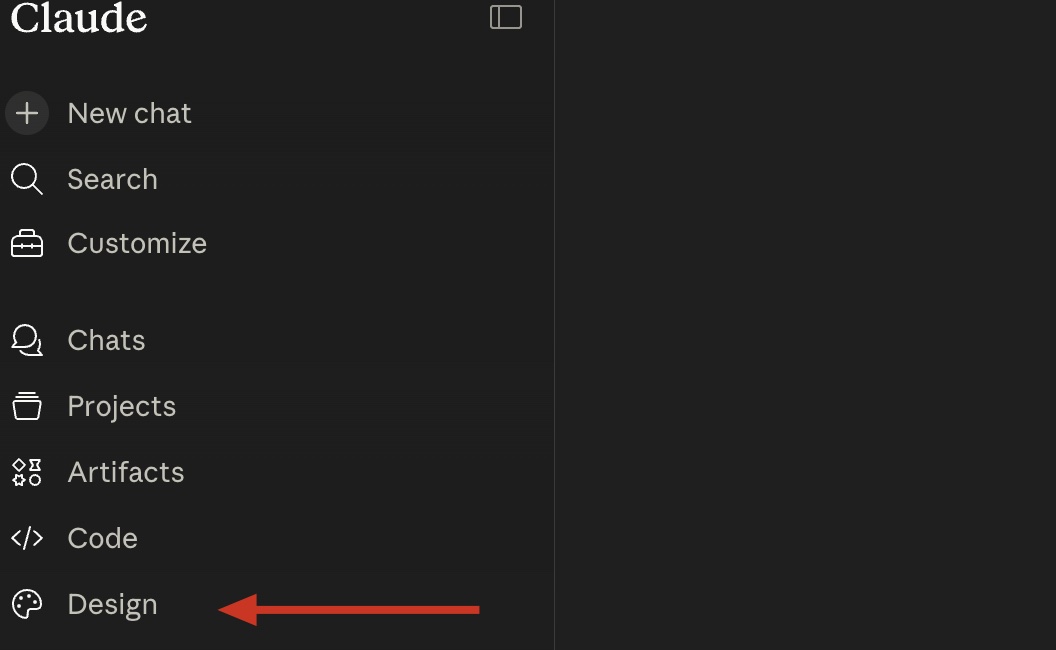
After clicking, you'll be brought to the Claude Design platform, where you can start creating visuals.
Your home screen should look like this:

You can also access Claude Design directly here:
https://claude.ai/design
That's it! You're inside Claude Design and ready to start creating.
Usage Limits
One thing worth knowing before I run you through the entire platform, real examples, and my pro tips:
Claude Design runs on its own separate usage allowance.
It does not count against your regular Claude chat or Claude Code limits.
As expected, Pro subscribers get a weekly allowance of Design prompts, while Max subscribers get a significantly higher limit with priority access.
Note that Claude Design usage limits are reset weekly - this is unlike the normal Claude chat, which resets every few hours.
Use your Design credits carefully!
Using Claude Design
Using Claude Design is extremely easy, and the interface is simple by design.
The Interface
The left side is your chat panel.

This is where you describe what you want, iterate on outputs, and give Claude direction.
The right side is your canvas.
This is your live, interactive space where you work in real-time.

Here, you'll find your recent projects, designs, real examples, and design systems.
Let me walk you through the Design Canvas and how you can start building:
Starting a Design
In the left sidebar, you'll see four options for getting started with a design:

Based on what you want to create, select one of the four options.
For general purposes, I recommend just selecting "Other," naming the Project, and selecting "Create."
Once created, a new Project Design Canvas will appear:

This is where you can start building in real-time.
You can start from scratch with natural prompts or add context (import data, Figma files, codebases, screenshots, and more).
Remember, as with any AI prompting, the more context, the better.
Congrats, you just started your first design!
You can also create new designs through "Design Systems" (my favorite option).
Design Systems
Design Systems are where you can set guidelines and rules for specific visuals.
Think of them like Claude Skills, but for visuals - just a place where Claude knows your preset guidelines/instructions.
For example, you can add your brand colors to a new Design System, and Claude will know the exact guidelines for creating visuals for your brand.
Under "Design Systems," click "Create New."

You'll then be asked to complete a data input field.
You don't have to complete everything, but the more context you provide, the better.

You can add your fonts, codebases, notes, and more.
Some advice: I actually recommend creating a Claude Skill first, then pasting it into the "Other Notes" section.
For example, I have a Claude Skill that contains the entire AI Edge brand guidelines (font, color palettes, everything).
I simply copied the .MD text and pasted it into the "Notes" section, and Claude Design now knows all the creative design components for the AI Edge brand (I'll show you what it made later).
Once you create a Design System, you can then go back to the left sidebar main menu and select it for projects.
For example, if I wanted to create a presentation with the AI Edge brand guidelines, I'd just select "Slide Deck" from the homepage and "AI Edge Design System."

Again, this is kind of like Claude Skills, but for design.
I personally have a few different Design Systems:
MHC (my finance brand visuals)
AI Edge (my AI media company visuals - where you're reading this)
Anthropic (for creating visuals in Anthropic's signature colors)
It makes creating graphics/visuals for each vertical super easy and repeatable.
Other things to note
Inside your Design Systems, you'll find a few things:
::

To summarize, you have two methods for creating new designs:
Now, let me show you some real design examples!
Real Examples
1. Iridescent Carb (by Anthropic)
An interactive prototype by the Anthropic team
```
Iridescent card - PROMPT

Create a monochromatic playing card. Display it on the page with a rich perspective hover effect and glow. The bright areas should be iridescent; there should be a subtle noise texture and specular glow that reacts to the mouse position. Add tweaks for as many aspects of this effect as you can.
```
2. AI Edge Brand Visual
A visual created based on one of my latest articles
3. MHC Brand Visual
A visual created based on my finance brand guidelines

Pro Tips
A rapid-fire section of pro tips (from my experience so far)
https://support.claude.com/en/articles/14604416-get-started-with-claude-design
Closing
So, there you have it, my Ultimate Guide to the new Claude Design platform.
Hopefully, you now understand just how powerful this new tool is and why I've completely switched to it for all my creative design needs.
If you made it this far, thank you for reading, and I hope you found this article valuable.
If you did, be sure to follow me @aiedge_ - I publish AI articles just like this one 2-3x/week.
If you enjoy written AI content, feel free to subscribe to my free newsletter, where I publish extra *free* AI content, prompts, workflows, and more:
https://www.aiedgehq.co/aiedgehq.co

Lastly, if you could, please Like/Repost this article so others can see it. 💙