@Tuuxxdotsol: GmetSharing the latest itera...
@Tuuxxdotsol
7 views
May 18, 2026
Advertisement
1
Gmet
Sharing the latest iteration of my @MeteoraAG DLMM strategy – 15 days in, results speak for themselves:
• P/L: +25% (+618 SOL)
• Win rate: 95% (positions) / 93% (days)
• Max drawdown: -3.2% (-97 SOL)
• Daily time spent: ~2h
🧵⬇️
Sharing the latest iteration of my @MeteoraAG DLMM strategy – 15 days in, results speak for themselves:
• P/L: +25% (+618 SOL)
• Win rate: 95% (positions) / 93% (days)
• Max drawdown: -3.2% (-97 SOL)
• Daily time spent: ~2h
🧵⬇️

2
1/ Identifying best pairs & pools:
To find the most efficient DLMM pairs & pools within my risk tolerance, I check the excellent Tokelo tool by @KalindroDB 4-5 times a day using the following filters:
• 24h Fee/TVL Ratio: Projected (top of the page)
This metric equally weights fee generation across different time frames. If a token generates proportionally more fees in the last 6 hours than over 24h, it means fee activity is increasing — the pair will move up the list. Big thanks to @KalindroDB for building this feature so quickly!
• Min Market Cap (M): 5
The lower the market cap, the higher the likelihood of a rapid drop below range.
• Min Liquidity (K): 200
Deep liquidity matters for two reasons: (1) I can deploy capital without overly diluting fee generation, and (2) tokens with high liquidity are generally "stronger" (i.e., less likely to rug or crash -50% in a short window).
• Min Bin Step: 80
Below 80 bin steps usually means much more active management and higher risk of being out of range (leading to significant IL).
• Min 24h Fees (K): 5
Ensures the pair has generated meaningful fees in the last 24h.
• Quote Token: SOL
I exclusively use SOL as the quote token — my goal with Meteora DLMM is to accumulate as much SOL as possible in anticipation of a price rebound.
• Show Single Best Fee/TVL Pool Per Token: Yes
This keeps the display clean and avoids clutter from multiple pools per pair.
• Max Bin Step: 250
Above 250, pools are usually not efficient enough in terms of fee generation.

3
2/ Risk Management
I strongly recommend defining your risk management strategy before entering the DLMM game.
I personally manage risk across 2 main axes:
A) Token Age
The newer the token, the more attractive it usually is in terms of fee generation (volume tends to spike post-launch) — but this comes with a much higher risk of sudden and severe corrections, which can easily push your position out of range and into the high IL zone — exactly what you want to avoid.
My advice for tokens launched within the last 48 hours: do extra research, such as:
• How many reputable traders are holding? (You can build your own list of trench gods using @Cielo)
• Is there real traction from users, KOLs, and traders on X, or does it look artificial?
• Are volume and activity organic — or do they come from bot spam and scary clusters?
The more confident you are, the more capital you can deploy.
But often, it's smarter to start small — or sit out entirely until the token stabilizes and proves itself.
B) SOL Allocation
Every time you open a new DLMM position, there’s a theoretical risk of losing most or all of the SOL you commit. I recommend setting clear allocation rules per pool based on measurable criteria.
Here’s how I approach it: 1x = 10% of my capital
• I usually allocate 1x to a “standard” token (i.e. top 5 on Tokelo)
• I go up to 3x for “very strong” tokens with: High market cap (typically >$100M), Deep liquidity (usually >$1M) and Track record (live for several days or weeks)
• I reduce to 0.5x for fresh launches if I see some potential but still have doubts
• I skip entirely when my research doesn’t give me enough confidence
For what it's worth, my only significant loss during this 15-day window came from a freshly pumped token I definitely should have skipped: Fartcat — sometimes the best trade is no trade at all.
4
3/ Profitability Management
Another key question to ask yourself when starting your DLMM journey is:
“When should I take profits and close my positions?”
Experience has taught me there’s no definitive answer to that.
Sometimes, your position slides to the bottom of the range, starts accumulating IL, and you decide to hold — only to end up fully out of range with no recovery.
Other times, you close early after a dip… and then watch the token pump right back above your initial range — and you hate yourself.
There’s no escaping this. Welcome to the world of memecoins.
Here’s what I personally do:
I close all my positions twice a day (profit or loss):
• Around 7–8am when I wake up
• Around 7–8pm when I’m back from work
This is probably not the most optimized approach — but at least it lets me lock in profits twice a day and feel good about it.
It also helps me reset with confidence, re-entering at the top of the range with fresh capital.
The only exception I allow is for very “strong” tokens.
If I get outranged but still have high conviction, I may avoid closing at a loss (often) and even removing liquidity and opening a new bid-ask position (token) when I've been outranged (almost never - except when @TendersAlt is buying the dip like a savage).
But be careful — this can backfire badly if your conviction is wrong.
Only do this when you truly trust the token’s ability to bounce quickly.

5
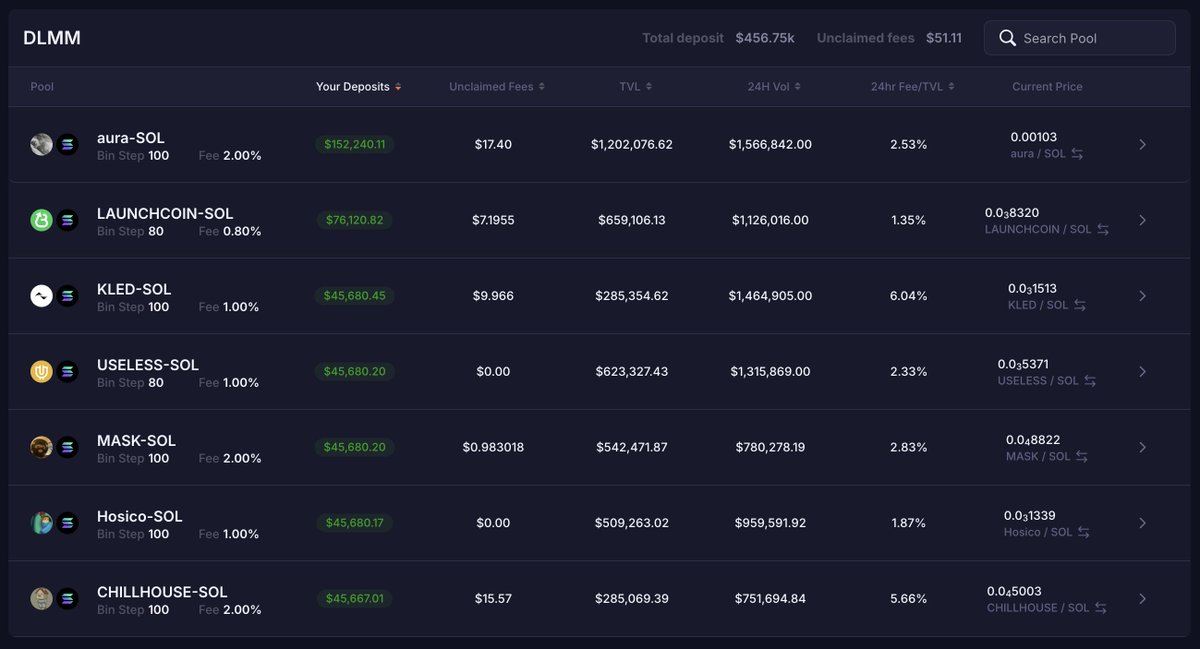
4/ Position Creation & Management
Now that you’ve (hopefully!) defined your own risk appetite and profitability strategy — it’s time to start creating positions.
Personally, I only go for SOL bid-ask setups. In my view, they currently offer by far the best risk/reward profile.
It’s honestly pretty straightforward — I don’t do any charting.
If I knew how to chart, I probably wouldn’t be larping on X... I’d already be a billionaire like every KOL-top-trader out there (right?).
Here’s my process:
• I pick the top 5–7 pairs/pools from my Tokleo dashboard*
• I allocate my SOL across the full range using a bid-ask curve
*Once you’ve gained some perspective (at least a few days of experience), prioritize pairs/pools that consistently appear in the top rankings — even if the returns seem slightly lower, they tend to be more stable and reliable over time.
Then, I check positions every 2–4 hours, and only close/recreate those that have been outranged from the top — as long as the pair/pool is still ranked among the best on Tokleo.

6
5/ Final Advice
Here are a few key principles that help me — and might help you too:
• Learn first — If you’re not confident with how Meteora DLMM works, start by watching a Bootcamp replay: youtube.com/@meteora-ag
• Start small — experiment with tiny amounts until you feel confident in your setup and routine.
• Stick to your plan — no matter what. Don’t let emotions override the risk or profit strategy you’ve defined. You should refine your approach regularly to adapt to market conditions — but never while your positions are bleeding.
• Give time some time — don’t judge your strategy after a few days. Let it play out over at least a few weeks.
• Use @lpagent_io to track your positions — it saves a lot of time compared to Meteora’s standard portfolio page.
• Prioritize a high win rate over chasing a few extra bucks — overextending your positions often leads to unnecessary losses. It helps build confidence. If you hit a rough patch, switching to a fresh wallet can help mentally reset and get back on track.
• Ask questions — seasoned DLMMers and traders are often open to sharing insights. @met_lparmy is a great place to learn and exchange with others.
• DYOR — This thread reflects my personal experience and opinions. It’s not financial advice — always do your own research and make your own decisions.
